


Using Free Photopea Plug-in (New for v4.1) 
If you don't have any PSD tools at hand, you can install the free Photopea plug-in to work with Cartoon Animator. With the image editor, you can create objects from your own images, or launch an object to edit its image or structure.
Photopea plug-in is a browser-based image editor.
Please make sure you connect to the internet when you are working with it.
To know more about the Photopea, please visit the Photopea official website.
You can learn more from the Photopea online manual.
-
Click the Install Photopea button in the Image Section of the Preference panel to download the Photopea plug-in from Reallusion Hub.
 Note:
Note:For a Pipeline version user of Cartoon Animator, you can get an ad-free version of the Photopea plug-in from the Reallusion Hub.
-
After the installation of the Photopea plug-in is done,
you can launch the Cartoon Animator and execute the Plugins >> Photopea >> Photopea from the Main menu.
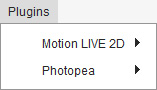
Alternatively, click the Photopea button on the Add-on Tool Bar.
Note:
button on the Add-on Tool Bar.
Note:If you cannot find the Photopea button on the toolbar, please check the Image Editor settings in the Preference panel.
-
Choose either of the import options in the following Launch PSD Editor dialog.
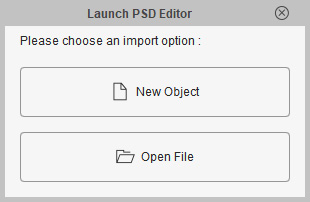
- New Object: This option will invoke Photopea with a blank new file.
- Open File: This option will open the file browser for you to choose an existing PSD file and then load it into Photopea.
-
By clicking the New Object button,
the Photopea plug-in will be automatically launched with a new file tab named Default.
You can now Start to create your PSD project.

- In the Photopea plug-in panel, you can execute the File >> New command to create a new PSD image, or execute the File >> Open command to open an existing PSD file.
-
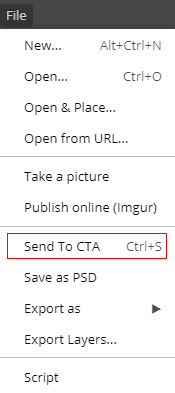
When you are satisfied with the current creation,
go to the File >> Send to CTA command, or press the hot keys: Ctrl + S to save the PSD file .
-
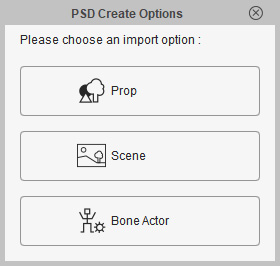
The PSD file will be sent to Cartoon Animator immediately with a dialog asking you to choose a suitable object type.
-
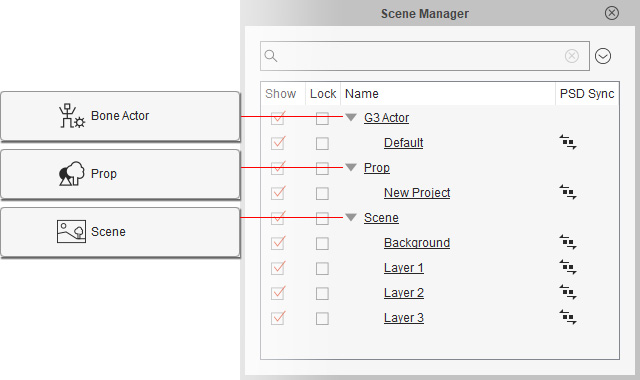
You will then find the PSD image is converted into the target object in the view port of Cartoon Animator.
The attributes of the created object and its sub-layers (if any) can be viewed in the Scene Manager.
Please also refer to the following sections for more information: