Types of Maps - PBR Shader Type
Each material can have up to 9 map channels that collaborate
with each other to form the texture of the object the material is applied in the PBR Shader Type.
You may go to the Texture Settings section in the Modify >>
Material tab to see these channels.
Base Color map
- The most frequently used texture mapping method. It wraps the bitmap image onto the 3D geometry surface while displaying its original pixel color.
- Any bitmap image, such as scanned images or images captured by digital camera, can be used as diffuse map to represent photo realistic quality.
-
Users can also use image software to make pre-rendered texture effects
such as shadow, bevel, bump, lighting or weathering effects. This
approach can effectively simulate real-world 3D effects while greatly saving
system resources and rendering time.

Without Base Color map
With Base Color map.
Opacity map
- Make transparency and cut-out effects from grayscale images. The black part will get cut out; the white part will be fully displayed; the gray values determine the transparency (alpha) level of the object.
-
Use bright gray RGB(253,253,253) on the Opacity map to make 2-sided 3D
Surface from Plane mesh.

Without Opacity map
With Opacity map
Bump map
-
When you import an image to the Bump channel, a
dialog will pop up to ask you the format of the image. Choose the
Bump
radio one if the image you want to import is in a grayscale one.

- Bump mapping uses the grayscale values of an image map to create variations in the shading of the surface to which the map is applied. It adds details to 3D models without increasing the number of polygons. In Character Creator, white areas of a bump map are shown as high and black areas are shown as low.
-
By moving around the light source we can see how the angular
light projection changes the bump look. If the light is facing the
surface from a straight 90 degrees angle it the bump effects are the least noticeable.

Without Bump map
With Bump map (grayscale)
Normal map
-
When you import an image to the Bump channel, a
dialog will pop up to ask you the format of the image. Choose the Normal
radio one if the image you want to import is in a normal-based one.

- A Normal map is made from a high polygon model. Its color representation will affect surfaces like a regular bump map while providing higher degrees of detail.
- Character Creator can import normal maps created in ZBrush or 3D Studio Max. By using Normal Maps you can make simple low-poly models appear as highly detailed 3D objects.
-
If the image you are loading is not a specially designed
normal map, then the result will not be as good.

Without Normal map
With Normal map
AO Map (Ambient Occlusion)
This texture mapping method enhance the intrusion and extrusion feeling of the meshes of an object by appending shades around the seams or overlapping edges.

|
|
|
Without AO map |
With AO map |
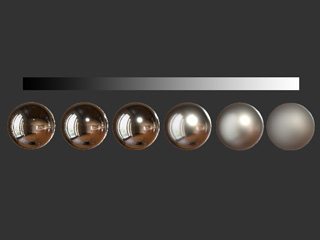
Metallic Map
This texture mapping method determines the reflectivity of the mesh surfaces to define them as insulate or metallic. The white means completely reflective while the black means non-reflective.
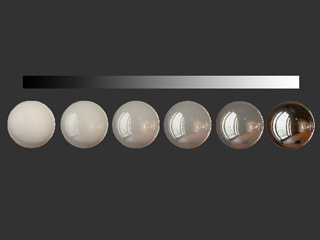
Roughness Map
Roughness map is used to describe the coarseness caused by mini apertures to define the microsurfaces. The surfaces mapped with white are relatively rough while the ones mapped with black are perfectly smooth.
The combinations of the Metallic and Roughness can thus depict almost every material in the real world.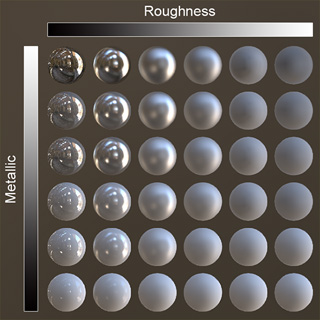
Displacement Map
You can create monochrome image maps with popular image-editing tools such as Photoshop. By using grayscale height maps, you can push and pull the surface of a 3D model to achieve the ideal look you desire.
Using a vector-based displacement map can produce undercut details on your model. Unlike the height displacement map (monochrome) simply stretches out geometry, vector displacement produces refined curves and edges, creating an unparalleled sense of detail to your model.

|
|
|
Without Displacement map |
With Displacement map |
You are allowed to load grayscale or vector-based displacement map. When you load an image, you will be asked if the image is grayscale or vector-based image.
Glow map
- This texture mapping technique allows users to control the glow shape, color and strength.
- Glow maps will blend with your original diffuse maps, so the lighter the diffuse color (or glow color), the stronger the glow effect.
-
A bright diffuse map in combination with a bright glow map might cause overexposure.

Without Glow map
With Glow map
 Note:
Note:Tips to create a subtle and effective glow effect:
- Choose a diffuse image which could ideally glow in the real world.
- Prepare the glow map, pattern and color design
- Start by testing from a darker glow map, then increase the brightness step by step to see the best brightness setting
- Decrease the overall ambient light
Blend Map
You may add any kind of images as the Blend map to blend with the Diffuse map, which increases the details and subtleties of the object. Character Creator also provides three methods, Multiply, Addition and Overlay, for blending.

|
|
|
Without Blend map |
With Blend map (Multiply mode) |

|
|
|
Without Blend map |
With Blend map (Addition mode) |

|
|
|
Without Blend map |
With Blend map (Overlay mode) |
