General Output Settings
The output settings for Image and Video are described in this section.
-
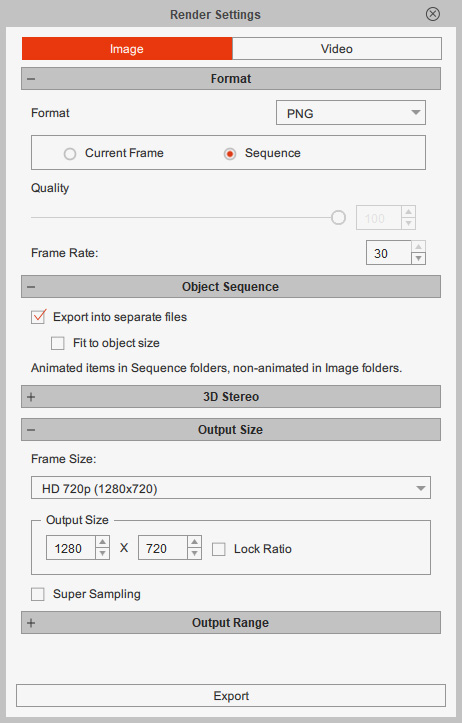
Utilize the Format drop-down list to decide the format (BMP / JPG / TGA / PNG / GIF) of the exported media.

- Determine if you want to export the entire project or just one image. Press F10 to preview the output image of the current frame.
- Drag the Quality slider to set the quality of the exported JPG images.
- Enter the desired frame rate, in frames per second, in the Frame Rate box (for sequence images only).
The Object Sequence setting is available when TGA or PNG is selected as the media format.
Activate the Export into separate files checkbox to export each object into full-scene 1:1 scale image sequences for further editing in a video editor. The Fit to object size option allows you to filter out static objects and export animated objects to their original object-size with the maximum bounding for the entire range of motion. Please refer to the Post-Production with Video Editor section for more information.
Note that the Object Sequence feature cannot work simultaneously with the 3D Stereo function.
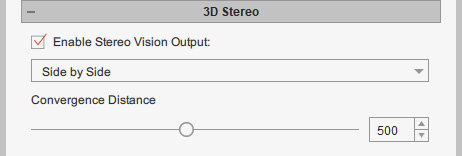
Activate the Enable Stereo Vision output checkbox to export your project as 3D stereo media. Please refer to the Creating a 3D Stereo Project section for more information.
Note that the 3D Stereo feature cannot work simultaneously with the Object Sequence function.
-
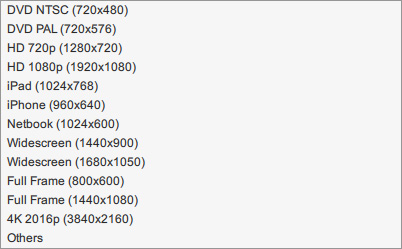
Choose a suitable output size from the Frame Size drop-down list,
or specify the resolution for the output frame by entering the width and height, in pixels, in the Output Size boxes.
- If you are using a virtual Microsoft operating system on a Mac personal computer, then you may need to activate the Super Sampling checkbox in order to rectify the aliasing issues in exported media. Please note that the Anti-alias in the Preference panel shall be enabled as well.
- This section is unavailable when the Fit to object size option is enabled in the Object Sequence section
The Output Range setting is available along with the Sequence option in the Format section.

Choose the Range radio button if you only want to export a specific part of the project.
You may also drag the Mark in / Mark out controls beneath the play bar
(the red triangles in the illustrator below) to specify the export range.

The GIF Option setting is available when GIF is selected as the media format.
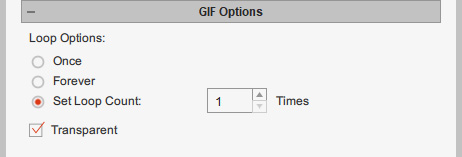
These three radio buttons determine the looping times of the GIF animation. If you want to export a GIF animation with alpha channel information, then activate the Transparent checkbox.
-
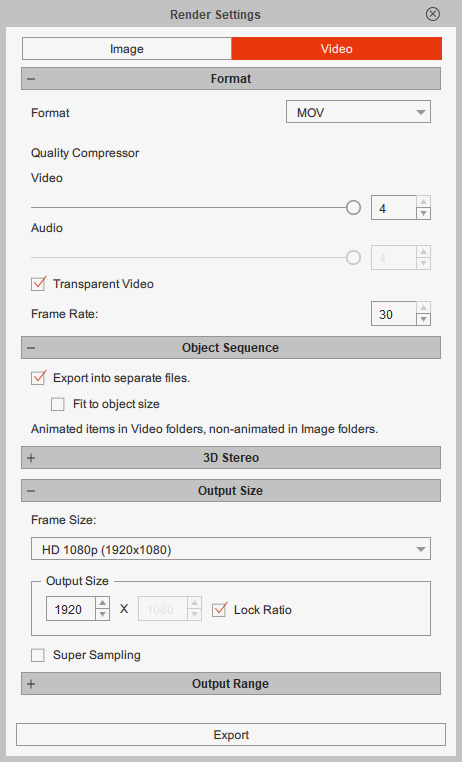
Utilize the Format drop-down list to decide the format (WMV / AVI / MP4 / popVideo / MOV / WAV) of the exported media.
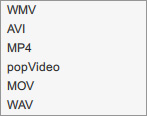
Supported video formats on Windows.
 Note:
Note:If you want to export into a QuickTime MOV file format on Windows, you will need to first download and install related software or codec such as K-Lite Codec Pack to playback the video files.
- Drag the Video and/or Audio sliders to set the compression quality of the exported media.
- Enter the desired frame rate, in frames per second, in the Frame Rate box (for AVI, popVideo and MOV only).
- Exclusive settings for popVideo:
The popVideo format is an exclusive format for synchronizing transparent video playback in iClone.
( Watch Tutorial - Export Transparent Videos to iClone )
You may enable the Export with Preview size video option to output additional media data of preview resolution, in addition to the original resolution. Then you can choose to preview PopVideos with the Preview resolution in the Preference panel to get better editing performance.
The popVideo objects inside the project will be rendered with low resolution by default. You may enable the Render popVideo with High Quality option to render the popVideo objects with original resolution. Note:
Note:If you wish to export as a popVideo with transparent background, remember to set the background as a solid color closing to your target for seamless video compositing. Please refer to the popVideo Converter Online Help for more information.
- Transparency settings for MOV:
The MOV videos support Transparency with the following settings.- To export a MOV with alpha channel on Windows, please activate the Transparent Video checkbox.
The Object Sequence setting is available when MOV is selected as the media format.
Activate the Export into separate files checkbox to export each object into full-scene 1:1 scale videos for further editing in a video editor. The Fit to object size option allows you to filter out static objects and export animated objects to their original object-size with optimized bounding for the entire range of motion. Please refer to the Post-Production with Video Editor section for more information.
Note that the Object Sequence feature cannot work simultaneously with the 3D Stereo function.

Activate the Enable Stereo Vision output checkbox to export your project as a 3D stereo media. Please refer to the Creating a 3D Stereo Project section for more information.
Note that the 3D Stereo feature cannot work simultaneously with the Transparent Video or Object Sequence function.
-
Choose a suitable output size from the Frame Size drop-down list,
or specify the resolution for the output frame by entering the width and height, in pixels, in the Output Size boxes.

- If you are using a virtual Microsoft operating system on a Mac personal computer, then you may need to enable the Super Sampling checkbox in order to rectify the aliasing issues in exported media. Please note that the Anti-alias in the Preference panel shall be enabled as well.
- This section is unavailable when the Fit to object size option is enabled in the Object Sequence section.

Choose the Range radio button if you only want to export a specific part of the project.
You may also drag the Mark in / Mark out controls beneath the play bar
(the red triangles in the illustrator below) to specify the export range.


