


GoZ Plus user interfaces (New for 4.42)
GoZ Settings panel (Character Creator to ZBrush)

- Template: Use this drop-down list to quickly set all the Actions of the list items at once. The possible settings are Create, Relink, and Custom. If the Actions of the list items deviate from the templates, then the Template will auto-switch to Custom.

- GoZ Plus: Disabling this option will revert the panel to legacy GoZ settings, including removing all parameters associated with subdivision levels, diffuse and normal maps.
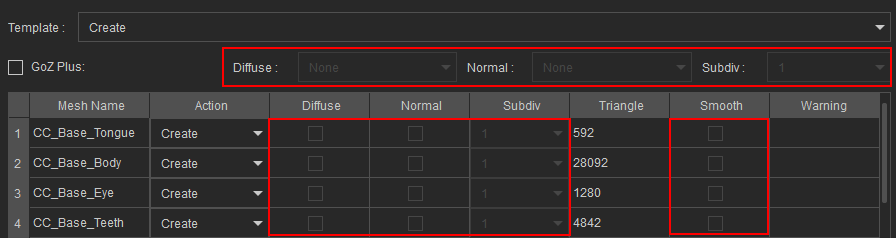
- Diffuse: Open this drop-down list to quickly enable or disable all the mesh’s Diffuse settings all at once. If the Diffuse settings in the list deviate from the templates, Diffuse will switch to Custom automatically.

- Normal: This drop-down list allows you to enable or disable all the mesh’s Normal settings at once. If the settings in the list deviate from the selected template, Normal will switch to Custom automatically.

- Subdiv: Use this drop-down list to choose the subdivision level for all the meshes at once. You can select a level from 1 to 7. The Default option gives a recommended level for each mesh and if the settings don't match the chosen template, then the Subdiv will switch to Custom automatically.

- Mesh Name: Displays all the names of the selected objects for export.
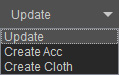
- Action: Use this drop-down list to determine if the item is to be exported as a new or a linked tool in ZBrush.
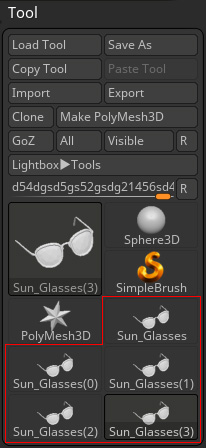
- Create: The item is exported as a new tool. Therefore, if you export the item with this action, more than one tool from this item will be shown in ZBrush.
- Relink: The item is exported as a linked tool. Only one tool will be shown and editable in the ZBrush Tool menu.

The tool files for GoZ are stored inside
“C:\Users\Public\Pixologic\GoZProjects\Default”.
- Create: The item is exported as a new tool. Therefore, if you export the item with this action, more than one tool from this item will be shown in ZBrush.
- Diffuse: Enable this option to allow polypaint on the selected mesh when using GoZ. This checkbox will be grayed out if the mesh lacks a diffuse map in CC.
- Normal: Enable this option to allow surface details on the selected mesh when using GoZ. This checkbox will be grayed out if the mesh lacks a normal map in CC.
- Subdiv: Select the desired subdivision level in this drop-down menu, ranging from 1 to 7.
- Triangle: Displays the total number of triangles for the corresponding mesh.
- Smooth: Enabling this will smooth out the subdivided model in ZBrush.
- Warning: Displays extra mesh information.
- Update Settings:
- Relink CC Polygroup: When enabled, replaces the existing polygroup of the CC3+ character with the default CC3+ character polygroup in ZBrush.

- Relink Mesh Changes in New Layer: When enabled, creates a new layer for all the relinked subtools in ZBrush, saving all the updated mesh and polypaint info inside it.

- Wrinkle to Displacement: When enabled, converts the character’s current Expression Wrinkles normal maps into mesh details in ZBrush.

- Match ZBrush Model Scale (x 0.01): When enabled, the scale of the export object will multiply by 0.01 to fit the ZBrush unit of measure.

- Relink CC Polygroup: When enabled, replaces the existing polygroup of the CC3+ character with the default CC3+ character polygroup in ZBrush.
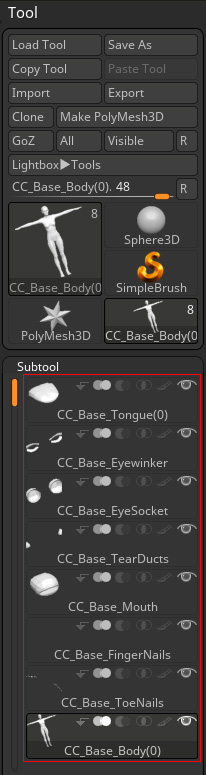
- Split Body Part: This section provides several options to separate the exported object into separate subtools.
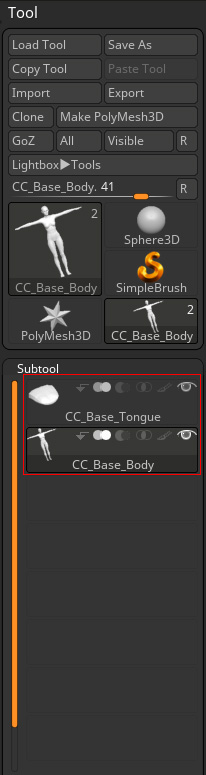
An unsplit character still has its tongue as a separate object.
A character with many split parts.
- Pose: Choose among the options to pose the character in ZBrush. The current options are the T-, A-, and current pose. Choose either the T- or A-pose to ensure successful round-trip modification between ZBrush and Character Creator.
- GoZ: Initiates the transferring process to ZBrush.
- Cancel: Exits the GoZ Settings panel without initiating GoZ.
GoZ Options panel (ZBrush to Character Creator)
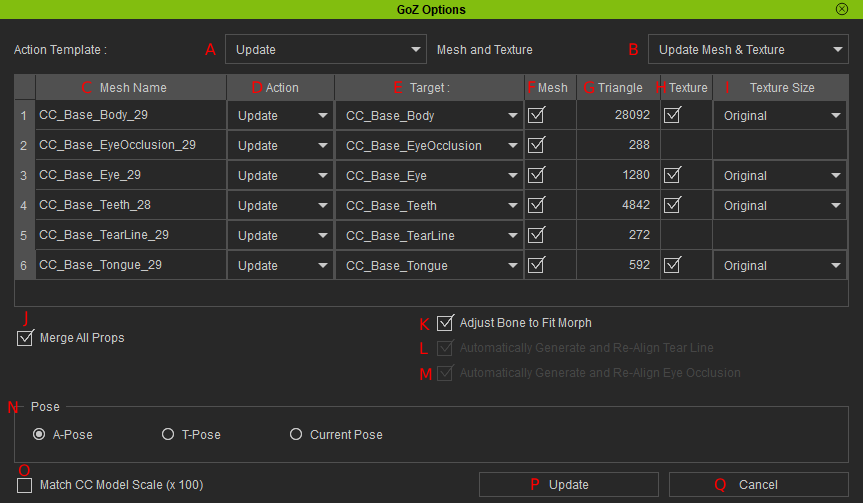
- Action Template: Opens the drop-down list to select all the item’s updates or create settings at once.
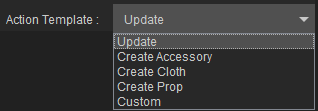
- Update: Updates all subtools from ZBrush to match the meshes in the CC Target list.
- Create Accessory: Adds all meshes as accessories into Character Creator.
- Create Cloth: Adds all meshes as clothing into Character Creator.
- Create Prop: Adds all meshes as props into Character Creator.
- Custom: If the Actions of the list items deviate from the templates, then Action Template will auto-switch to Custom.
- Mesh and Texture: Provides preset options for sending data to Character Creator.
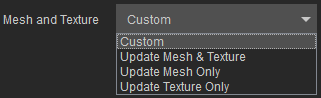
- Custom: This option appears when the settings have been manually tweaked.
- Update Mesh & Texture: Activates all the Mesh and Texture options.
- Update Mesh Only: Activates all the Mesh options.
- Update Texture Only: Activates all the Texture options.
- Mesh Name: Displays the names of the items to be transferred back to Character Creator.
- Action: Provides options for syncing items already sent to ZBrush, creating a new accessory, or creating a new cloth.
- Target: This drop-down list contains all the models matched by their vertex count. You can determine which target gets updated.
- Mesh: Toggle this checkbox to determine whether or not to update the target object or create a new one.
- Triangle: Displays the total number of triangle polygons of the corresponding mesh.
- Texture: Activate this option to bring ZBrush textures into Character Creator. If the target object contains multiple materials (like a mouth object with teeth and tongue materials), then the cell will be empty.
- Texture Size: Adjusts the texture resolution for the imported textures.
- Merge All Props: Activate this checkbox to merge all props into one geometry.
- Adjust Bone to Fit Morph: Enabling this option lets Character Creator auto-adjust bone locations and lengths to accommodate the changes to the character proportions. All character meshes must be selected for transfer in ZBrush to make this option available.

- Automatically Generate and Re-Align Tear Line: nable this option to discard the original TearLine meshes and have Character Creator generate new ones.
- Automatically Generate and Re-Align Eye Occlusion: Enable this option to discard the Occlusion meshes and have Character Creator generate new ones.
- Pose: Contains several options for posing the CC character, particularly for matching the pose in ZBrush.
- Match CC Model Scale (x 100): Imports the ZBrush object with a scale multiplied by 100 to be compatible with the unit of measure in Character Creator.
- Update: Initiates the update process to Character Creator.
- Cancel: Cancels the current update and closes the panel.
ZBrush settings (ZBrush to Character Creator)
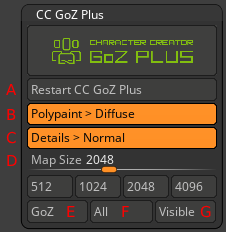
- Restart CC GoZ Plus: Resets the connection between Character Creator and ZBrush. You can use this feature to re-establish a link if ZBrush crashes during the GoZ process.
- Polypaint > Diffuse: Enable this to convert your subtools polypaint into diffuse maps.
- Details > Normal: Enable this to convert your subtools mesh details into normal maps.
- Map Size: Sets the texture map resolution for transfer to Character Creator.
- GoZ: Sends only the currently selected subtool.
- All: Transfers all the subtools listed in the Subtool tab.
- Visible: Sends only the subtools that are currently visible to the Character Creator.
