The User Interface Introduction of Exporting Alembic
The Exporting Alembic feature can be found in the File menu >> Export.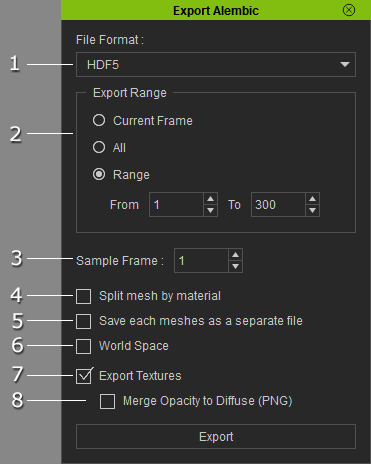
|
1 |
File Format |
Use the drop-down list to determine the format for exporting Alembic.
|
|
2 |
Choose one of the radio buttons to determine that the exported Alembic is from one frame, all frames or partial project frames. |
|
|
3 |
Set a value to determine the sample times per frames. The higher the value is, the rougher the animation of the Alembic will be. |
|
|
4 |
Mesh with multiple materials applied will be split into different meshes based on the distribution of the materials (for alembic export). This setting is for Maya and Hitfilm or any 3D software that does not support mult-materials. |
|
|
5 |
Save each mesh as a separate file |
Activate this checkbox to save the individual meshes into a separate files. This setting is suitable for Unreal,
which only accepts single mesh files. |
|
6 |
Activate this box in order to include the transformation data of the selected object when it is exported into Alembic file. |
|
|
7 |
Export Texture |
If you want to export the texture images along with the Alebmic file in the same folder, then activate this box. |
|
8 |
Merge Opacity to Diffuse (PNG) |
Some 3D tools do not support Opacity texture, such as HitFilm. Therefore, you need to merge the Diffuse and Opacity textures into a PNG image with Alpha information to correctly re-build the transparent results in the tool. |

