Steps Panel
At the left side of the application is the Steps panel, which guides
the creation and characterization of a model from the beginning in the
course of several steps.
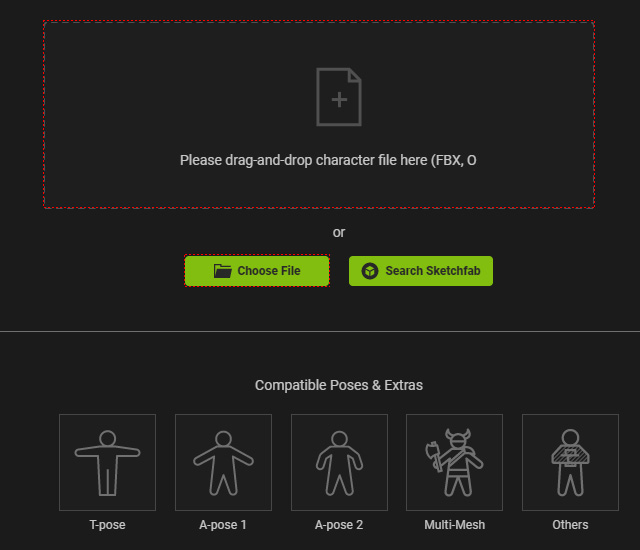
- Click this step to start loading static model file in FBX or OBJ format.
- You can drag and drop the file to the working area.
- Alternatively, click the areas marked in the illustration to open the browser to load the file.
In this step, you can check the direction and the center line of the model.
- Direction: Due to the source 3D application with different coordination system, the imported model maybe in different orientation. You can adjust the direction of the model by 3 axis in 90 degrees.
- Center Line: The center line can be used to relocate the root of the model in case the model is not in the world center when it is exported from other 3D tools.
- ActorCore AccuRIG will automatically and properly distribute the reference joints to the model.
- You are free to drag the joints to be relocated to appropriate positions with Midpoint Placement feature.
- The unnecessary joints can be masked out in this step.
- Rotating the camera view is allowed if necessary.
- The number of the finger can be set in this step.
- You can drag and set the finger joints to the proper position.
- Besides, you need to adjust the angle of the thumbs.
- Rotating the camera view is allowed if necessary.
- When you access this step, ActorCore AccuRIG will build bone structure based on the reference joints you placed in the previous two steps.
- You can apply different poses or motion to check out the movement result. Repeat the previous steps if necessary.
- You can also fine-tune the bone directions in this step.
- The characterized actor can thus be exported in FBX, USD (for Omniverse), iAvatar (for iClone and Character Creator) formats or be uploaded to the ActorCore web page for sale.
