Introduction for Export to After Effects Panel
The Export to After Effects panel allows you to render selected objects for editing in Adobe After Effects. Subsequently, the Cartoon Animator - AE Script can be used to link Cartoon Animator and Adobe After Effects.

The installation of Cartoon Animator - AE Script in Adobe After Effects is required for enabling the CTA project import. Click the link Download After Effects script to download the Cartoon Animator - AE Script and install it in After Effects. After your CTA package is ready, you can import the animation projects (JSONs) to After Effects via this installed panel.
Note that if you have been a Beta user of Cartoon Animator - AE Script, please re-download and re-install it to get the updated version 2.0.
In this section, choose the objects you want to bring into Adobe After Effects for further editing.

- Title Bar
Click the title bar "-" or "+" to collapse or expand the section. - Menu
Click the down arrow button to pop up the menu for advanced selection options: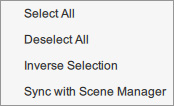
- Select All: Enable all the object checkboxes.
- Deselect All: Disable all the object checkboxes.
- Inverse Selection: Invert the current selection.
- Sync with Scene Manager:
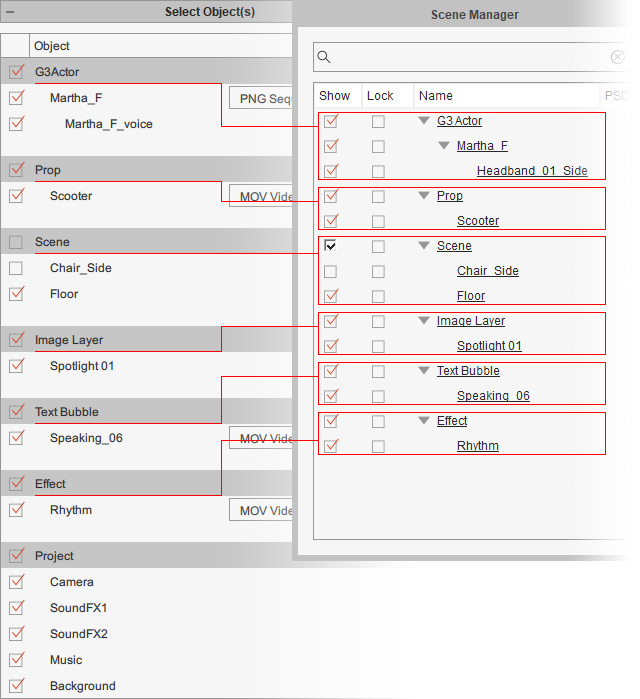
Synchronize with the object show / hide status in the Scene Manager.
- Object List:
Enable / disable the checkboxes beside the objects to select those you wish to output. Objects in the current project are listed in this field with the same categorization from Scene Manager for better observation.
The selection status is synced with the object show / hide status in the Scene Manager by default, unless the Sync with Scene Manager option is disabled in Menu (b).- G3Actor: G3 360 or G3 character templates from the Actor libraries, or custom Free Bone characters, along with the accessories attached on them.
You can decide whether to output voice from characters.
- (Object Name)_Voice: Voice clips from the character's Voice Clip track.
- Actor: G2+, G2 or G1 character templates from the Actor libraries, along with the accessories attached on them.
You can decide whether to output voice from characters.
- (Object Name)_Voice: Voice clips from the character's Voice Clip track.
- Prop: Props from the Prop libraries, or custom media.
You can decide whether to output voice from props.
- (Object Name)_Voice: Voice from the object media.
- Scene: Scene templates from the Scene libraries, or custom media.
- (Object Name)_Voice: Voice from the object media.
- Image Layer: Image layers templates from the Scene > Image Layer library, or custom media.
You can decide whether to output voice from image layers.
- (Object Name)_Voice: Voice from the object media.
- Text Bubble: Text bubbles from the SFX > Text libraries.
- Effect: Special effects from the SFX > Object library.
- Project: Camera movement keys and audio clips from the Timeline > Project tracks, or background media.
- Camera: Camera movement keys on the Camera track.
- Sound FX1: Audio clips on the Sound FX1 track. They could be sound templates from the SFX > Sound library, or custom audio files.
- Sound FX2: Audio clips on the Sound FX2 track. They could be sound templates from the SFX > Sound library, or custom audio files.
- Music: Audio clips on the Music track. They could be sound templates from the SFX > Sound library, or custom audio files.
- Background: Background media.
It could be default background color, background material from the Scene > Background library or the Project Settings panel, or custom media.
You can decide whether to output voice from a background medium.
- Background_Voice: Voice from the background media.
- G3Actor: G3 360 or G3 character templates from the Actor libraries, or custom Free Bone characters, along with the accessories attached on them.
You can decide whether to output voice from characters.
- Format Options:
Choose the output format for an object group or an individual object from the drop-down list.
- PNG Sequence: Export objects to sequenced PNG images, as well as its transformation keys to represent the object animation. After export, these images will be generated to the Sequence Image folder in a CTA Package, while the transformation keys will be recorded in an extra JSON file.
- MOV Video: Export objects to an individual transparent MOV video to represent the object animation. Although this option can not export object transformation keys, these videos can bring facial expressions, body motions, or layer order changes on the objects. After export, they will be generated to the Video folder in a CTA Package.
- Custom: Export objects to different formats to customize your export under an object group.
- Objects with transformation keys only. After export, they will be generated to the Single Image folder in the CTA Package.
- Static objects. After export, they will be generated to the Single Image folder in the CTA Package.
- Audio objects. After export, they will be generated to the Audio folder in the CTA Package.
- Camera (movement keys). After export, they will be recorded in the extra JSON file.
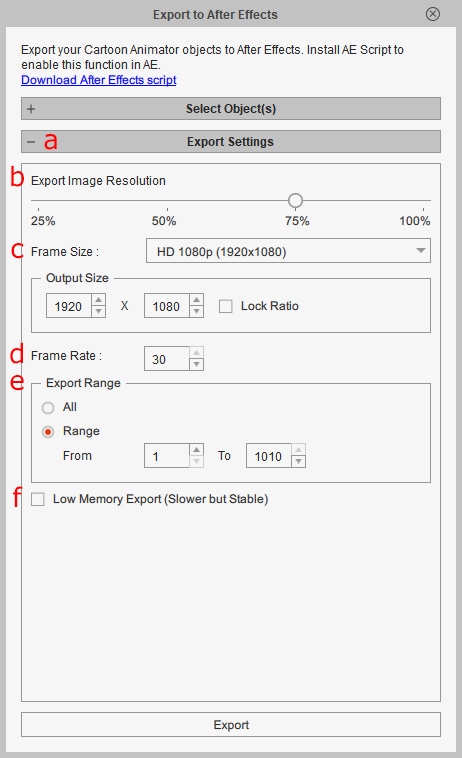
In this section, configure the settings for exporting the selected objects with the desired image resolution, frame size, frame rate and output range.
- Title Bar
Click the title bar "-" or "+" to collapse or expand the sections. - Export Image Resolution
Adjust the output image resolution for the objects. The default quality 75% will be good for the frame size 1920x1080. The lower image resolution can scale down the image size of objects and speed up your output.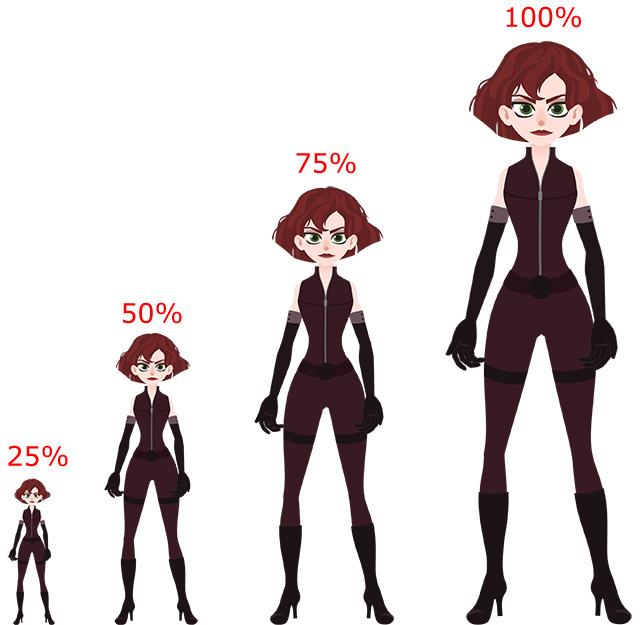
However, the Export Image Resolution setting will not change the object proportions in the project, but may blur the image view in the video editor. Scaling down the resolution can be ideal for small ads or banner designs in the video editor. You can also preview and edit objects in lower resolution temporarily, and then replace them with the desired resolution when editing is complete.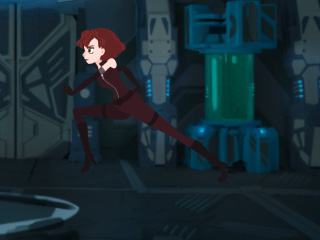

- Export Image Resolution = 25%
- Output Size = 320x240- Export Image Resolution = 100%
- Output Size = 320x240 - Frame Size and Output Size:
Choose a suitable output size from the Frame Size drop-down list, or specify the resolution for the output frame by entering the height and width, in pixels, in the Output Size boxes.
The Frame Size and Output Size are used to decide the resolution of Project and Scene compositions in After Effects only, and will not affect the source image resolution. - Frame Rate
Enter the desired frame-rate (frames per second), in the Frame Rate box. Higher frame-rates equate to more images being sequenced, and vice versa. - Export Range
Choose the Range radio button if you only want to export a specific part of the project.
You may also drag the Mark in / Mark out controls beneath the play-bar (the red triangles in the illustrator below) to specify the range for export.
- Low Memory Export (Slower but Stable)
Activate this checkbox to fix the broken images in the output, which may occur on some low-level computers. By enabling this option, the render time may be prolonged.