|
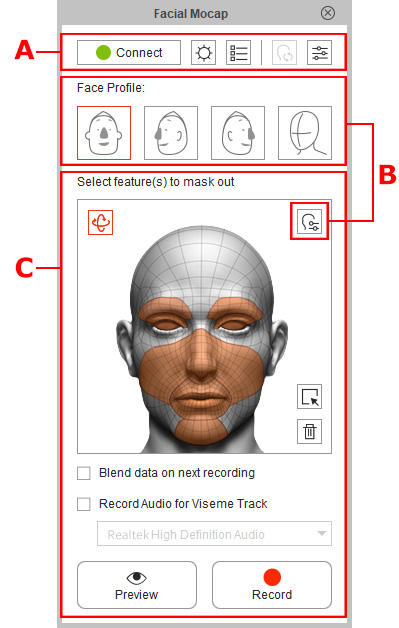
A
|
General Settings
|
Connection Settings
- Connecting:
Click the Connect button to connect the iPhone X in the same domain for facial mocap.
When the light-on/off signal inside the button becomes green, you are successfully connected to a server.
If the green light went off, then click on the button to turn it green.
If it is still not on, then make sure that the server is setup correctly.
 |  | | Light-on signal: Connected to the device. | Light-off signal: Disconnected from the device. |
- Server Settings: After you have connected a device, you can click the Server Settings
 button to do further IP Address editing. button to do further IP Address editing.
- Tracking Data Inspector: Click the Tracking Data Inspector
 button, to use the inspector to observe the Face ID stream
from Live Face iPhone X App for further adjustments. button, to use the inspector to observe the Face ID stream
from Live Face iPhone X App for further adjustments.
Motion Capture Settings
- Zero Pose: Click the Zero Pose
 button to toggle between the custom and iPhone X initial pose in the Preview or Record mode. button to toggle between the custom and iPhone X initial pose in the Preview or Record mode.
- Strength Filters: Click the Strength Adjustment
 button, and you can use the sliders in this group to increase or decrease the movement of specific facial features instead of asking the human actor / actress
to adjust his / her facial features. button, and you can use the sliders in this group to increase or decrease the movement of specific facial features instead of asking the human actor / actress
to adjust his / her facial features.
|
|
B
|
Face Profile and
Expression Mapping Tools
|
- Face Profile:
Click the profiles to change the preset facial mapping settings.

- Expression Mapping:
Cick the Expression Mapping
 button, there are more than 60 morph profiles in the form of sliders for you to customize the results of the facial mocap. button, there are more than 60 morph profiles in the form of sliders for you to customize the results of the facial mocap.
|
|
C
|
Facial Mocap Controls
|
- Mocap Recording: Use the mask pane to record the data
stream transferred from the Live Face iPhone X App.
- Blend data on next recording: Activate this checkbox so that the new motions, of the selected features, are blended into existing keys after recording.
- Audio Recording: Activate the Record Audio for Viseme Track
checkbox and pick the microphone from the drop-down list in order to voice capture while doing the expressions.
|