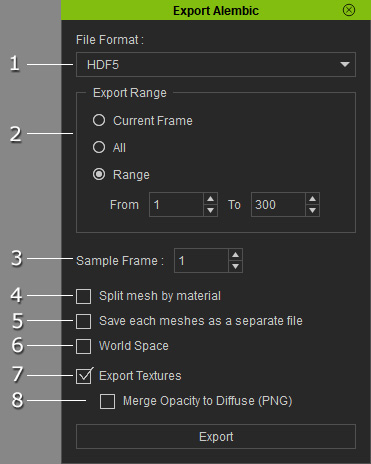
The User Interface Introduction of Exporting Alembic
The Exporting Alembic feature can be found in the File menu >> Export.
|
1 |
File Format |
Use the drop-down list to determine the format for exporting Alembic.
|
|
2 |
Choose one of the radio buttons to determine that the exported Alembic is from one frame, all frames or partial project frames. |
|
|
3 |
Set a value to determine the sample times per frames. The higher the value is, the rougher the animation of the Alembic will be. |
|
|
4 |
Activate this box in order to include the transformation data of the selected object when it is exported into Alembic file. |
|
|
5 |
Export Texture |
If you want to export the texture images along with the Alebmic file in the same folder, then activate this box. |
|
5 |
Merge Opacity to Diffuse (PNG) |
Some 3D tools do not support Opacity texture, such as HitFilm. Therefore, you need to merge the Diffuse and Opacity textures into a PNG image with Alpha information to correctly re-build the transparent results in the tool. |
