Attribute Tab
The Attribute Tab contains different sections with settings for adjusting select objects. However, the numbers of sections differs accordingly:
When you create a new project in which only the turntable, light, sky and camera exist, the sections in the Attribute tab
will resemble those below: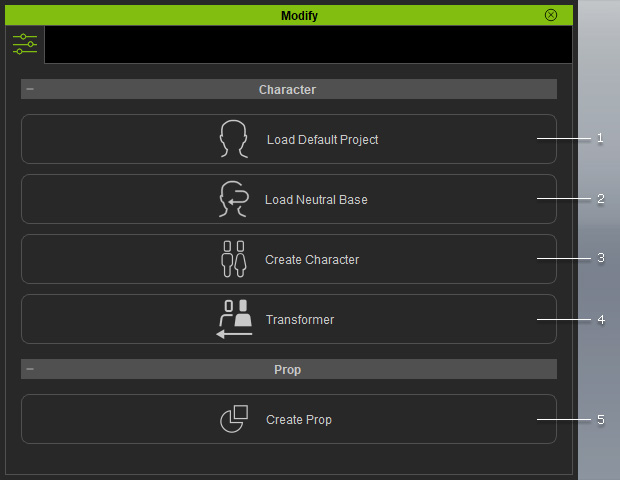
|
1 |
Load Default Project: Loads the default project. |
|
2 |
Load Neutral Base: Loads a neutral base character without any body characteristics. |
|
3 |
Create Character: Loads a file in FBX or OBJ format to create a Creature or Humanoid character. |
|
4 |
Transformer: Loads a FBX file exported from DAZ. |
|
5 |
Create Prop: Loads a FBX or OBJ file to create a Prop. |
When the character is selected, the sections in the Attribute tab will
resemble the following: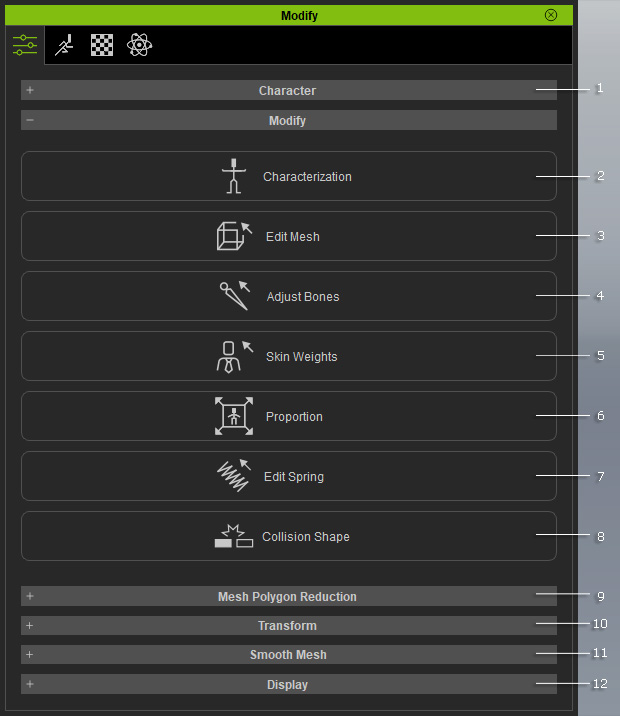
|
1 |
Character section: Shows the basic information of the character. |
|
2 |
Characterization: Click this button to modify the characterization settings; or convert Creature characters to Humanoid. |
|
3 |
Edit Mesh: Provides tools for fixing mesh related imperfections. |
|
4 |
Adjust Bone: This feature provides tools to move or rotate bones without affecting the mesh. |
|
5 |
Skin Weight: Use the tools in this mode to manually adjust skin weights. |
|
6 |
Proportion: This feature provides tools to move and rotate the bones and mesh. |
|
7 |
Edit Spring: This feature can be used to set spring properties on the Used Bones in the Bone List panel. |
|
8 |
Collision Shape: This feature can be used to add collision shapes to the character. |
|
9 |
Mesh Polygon Reduction section:
|
|
10 |
Transform: Lets you to relocate and rotate the character. |
|
11 |
Smooth Mesh: Lets you Evolve the character, real-time smooth or subdivide the actual meshes. |
|
12 |
Display section: Lets you show / hide, set the render states and shadow mode for the selected object. |
When the character is selected, the sections in the Attribute
tab wil resemble those below: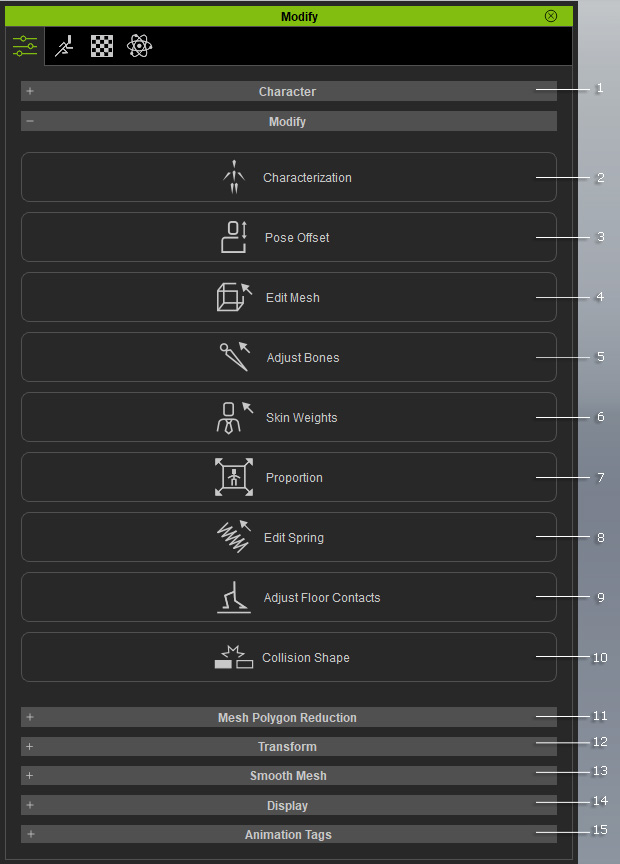
|
1 |
Character section: Shows the basic information of the character. Lets you open or close the character's eyes and mouth, and set the Auto-Blinking motions. |
|
2 |
Characterization: Click this button to modify the characterization settings; or convert Humanoid characters to Creature. |
|
3 |
Pose Offset: Lets you to fix the angle of the limbs. |
|
4 |
Edit Mesh: Provides tools for fixing mesh related imperfections. |
|
5 |
Adjust Bone: This feature provides tools to move and rotate bones without affecting the mesh. |
|
6 |
Skin Weight: Use the tools in this feature to manually adjust skin weights. |
|
7 |
Proportion: This feature provides tools to move or rotate bones and mesh. |
|
8 |
Edit Spring: This feature can be used to set spring properties on the Used Bones in the Bone List panel. |
|
9 |
Adjust Floor Contacts: Click this button to modify the floor contact for the hands and feet. |
|
10 |
Collision Shape: This feature can be used to add collision shapes to the character. |
|
11 |
Mesh Polygon Reduction section:
|
|
12 |
Transform: Lets you to relocate and rotate the character. |
|
13 |
Smooth Mesh: Lets you Evolve the character, real-time smooth or subdivide the actual meshes. |
|
14 |
Display section: Lets you show / hide, set the render states and shadow mode for the selected object. |
|
15 |
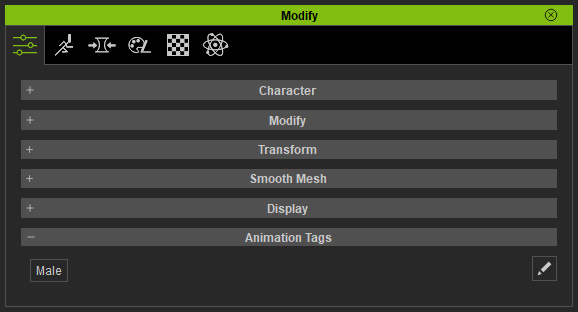
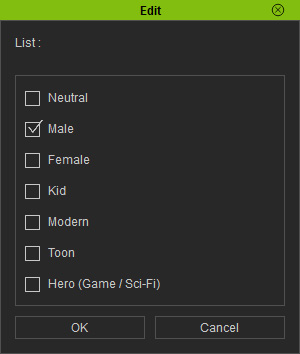
Animation Tag section: The default motion of the character will show in this section. You can click the Edit button at the right side in this section to show the desired tags. These tags will be used for specific feature coming soon in the near future. |
When the character is selected, the sections in the Attribute tab will tend to resemble those of below: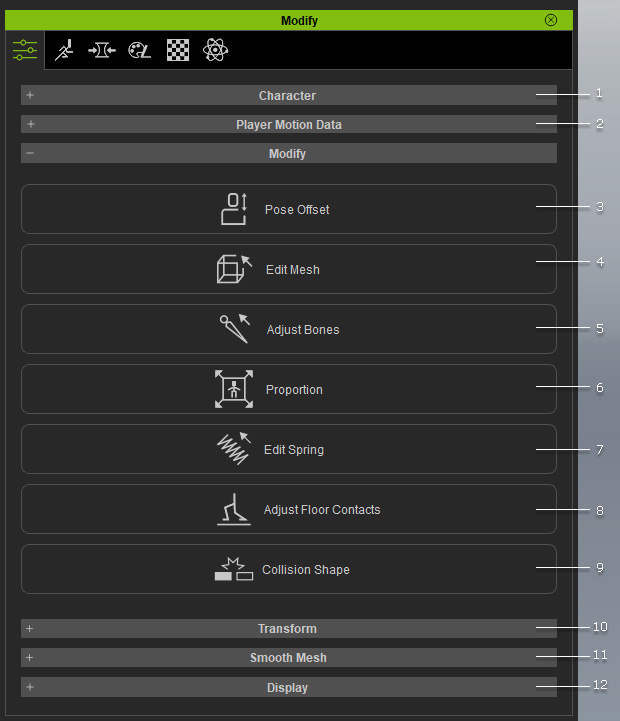
|
1 |
Character section: Shows the basic information of the character. Lets you open or close the character's eyes and mouth, and set the Auto-Blinking motions.
|
|
2 |
Player Motion Data section: |
|
3 |
Pose Offset: Lets you to fix the angle of the limbs. |
|
4 |
Edit Mesh: Provides tools for fixing mesh related imperfections. |
|
5 |
Adjust Bone: This feature provides tools to move or rotate bones without affect the mesh. |
|
6 |
Proportion: This feature provides tools to move or rotate the bones and mesh. |
|
7 |
Edit Spring: This feature can be used to set spring properties on the Used Bones in the Bone List panel. |
|
8 |
Adjust Floor Contacts: Click this button to modify the floor contact for the hands and feet. |
|
9 |
Collision Shape: This feature can be used to add collision shapes to the character. |
|
10 |
Transform: Lets you to relocate and rotate the character. |
|
11 |
Smooth Mesh: Lets you Evolve the character, real-time smooth or subdivide the actual meshes. |
|
12 |
Display section: Lets you show / hide, set the render states and shadow mode for the selected object. |
When the Tongue or the Body meshes are selected, the sections in the Attribute tab are shown in the illustration blow: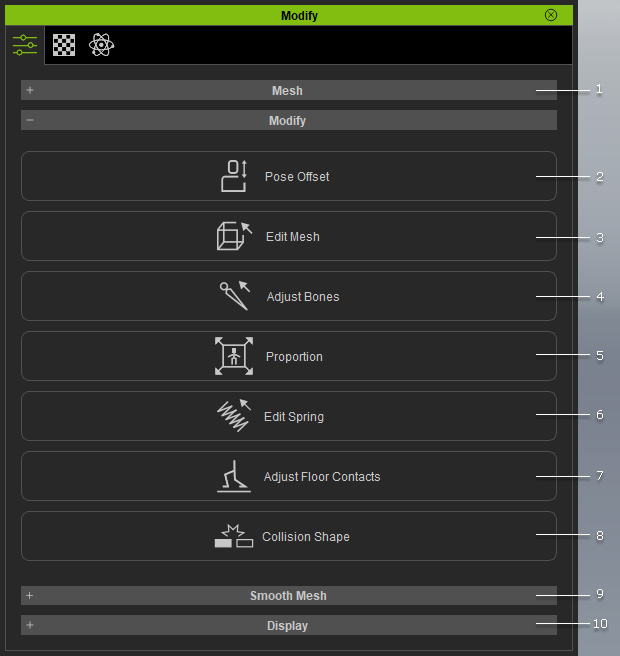
|
1 |
Mesh Data section: Displays the name of the mesh. |
|
2 |
Pose Offset: Lets you to fix the angle of the limbs. |
|
3 |
Edit Mesh: Provides tools for fixing mesh related imperfections. |
|
4 |
Adjust Bone: This feature provides tools to move or rotate bones without affecting the mesh. |
|
5 |
Proportion: This feature provides tools to move or rotate the bones and mesh. |
|
6 |
Edit Spring: This feature can be used to set spring properties on the Used Bones in the Bone List panel. |
|
7 |
Adjust Floor Contacts: Click this button to modify the floor contact for the hands and feet. |
|
8 |
Collision Shape: This feature can be used to add collision shapes to the character. |
|
9 |
Smooth Mesh: Lets you Evolve the character, real-time smooth or subdivide the actual meshes. |
|
10 |
Display section: Lets you show / hide, set the render states and shadow mode for the selected object. |
When the Eye or the Teeth meshes are selected, the sections in the Attribute tab are shown in the illustration blow: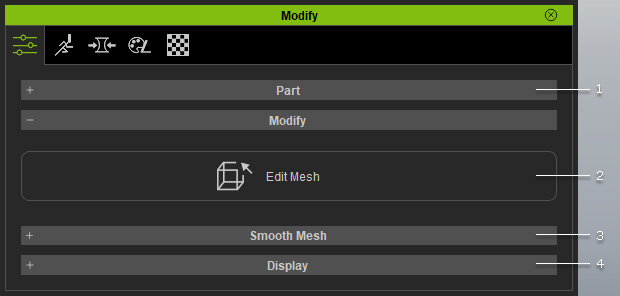
|
1 |
Part section: Displays the basic data of the Eye and Teeth meshes and let you open/close the eyes and mouth. |
|
2 |
Edit Mesh: Provides tools for fixing mesh related imperfections. |
|
3 |
Smooth Mesh: Lets you Evolve the character, real-time smooth or subdivide the actual meshes. |
|
4 |
Display section: Lets you show / hide, set the render states and shadow mode for the selected object. |
When the EyeOcclusion or the TearLine meshes are selected, the sections in the Attribute tab are shown in the illustration blow: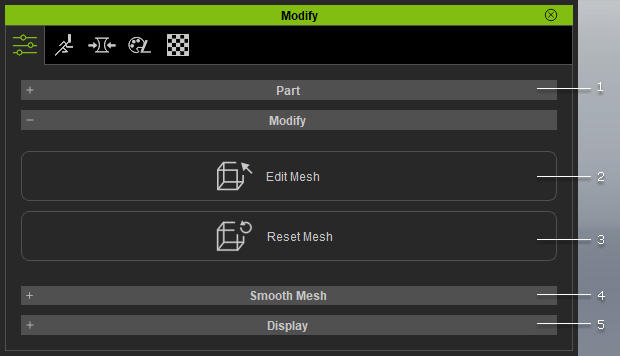
|
1 |
Part section: Displays the name of the EyeOcclusion, TearLine meshes and let you open/close the eyes and mouth. |
|
2 |
Edit Mesh: Provides tools for fixing mesh related imperfections. |
|
3 |
Reset Mesh: Discard any modification made by the Edit Mesh feature. |
|
4 |
Smooth Mesh: Lets you Evolve the character, real-time smooth or subdivide the actual meshes. |
|
5 |
Display section: Lets you show / hide, set the render states and shadow mode for the selected object. |
When the character's hair is selected, the sections in the Attribute
tab will resemble the following illustration: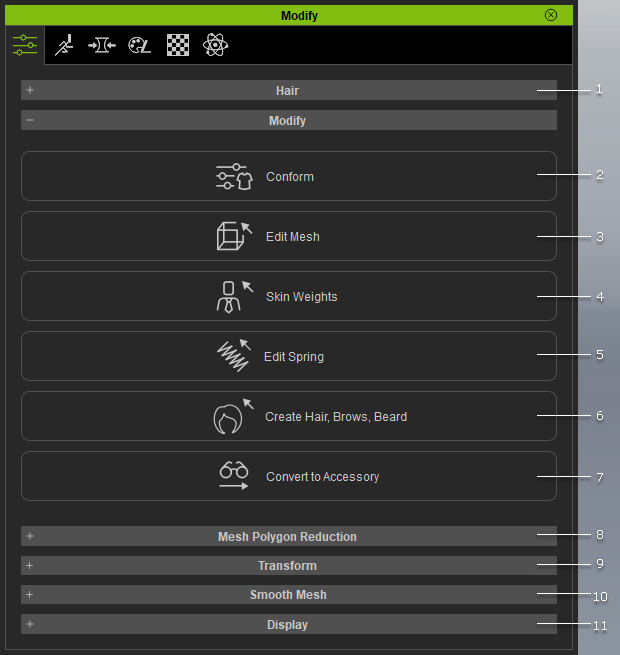
|
1 |
Hair section: Displays the name of the hair. |
|
2 |
Conform: Lets you conform the hair to the character's head. The method is the same as conforming for clothes. |
|
3 |
Edit Mesh: Provides tools for fixing mesh related imperfections. |
|
4 |
Skin Weight: Lets you modify the skin weights manually. |
|
5 |
Edit Spring: This feature can be used to set spring properties to the Used Bones in the Bone List panel. |
|
6 |
Create Hair, Brows, Beard: Lets you assign an automatic skin weight template. |
|
7 |
Convert to Accessory: Converts the currently selected hair to an accessory. |
|
8 |
Mesh Polygon Reduction section:
|
|
9 |
Transform section: Lets you transform the RTS (Rotation, Transformation and Scale) attributes for the hair. |
|
10 |
Smooth Mesh: Lets you smooth real-time smooth or subdivide the actual hair mesh |
|
11 |
Display section: Lets you show/hide, set the render states and shadow mode for the selected object. |
When the character's eyebrows or beard is selected, the sections in the Attribute
tab will resemble the following illustration: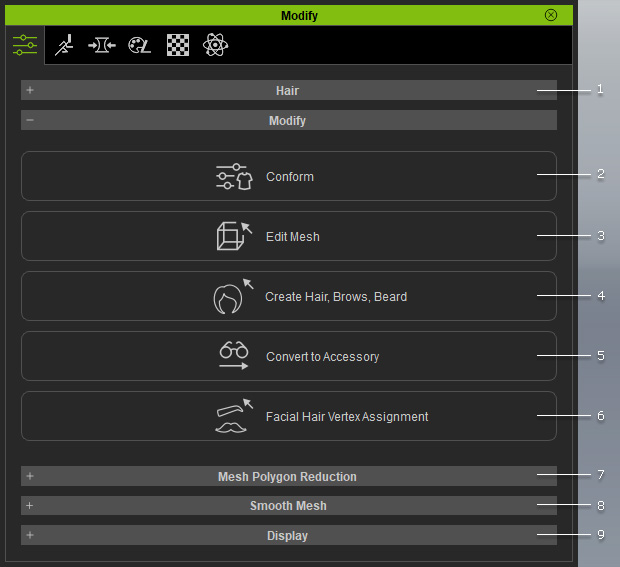
|
1 |
Hair section: Displays the name of the hair. |
|
2 |
Conform: Lets you conform the hair to the character's head. The method is the same as conforming for clothes. |
|
3 |
Edit Mesh: Provides tools for fixing mesh related imperfections. |
|
4 |
Create Hair, Brows, Beard: Lets you assign an automatic skin weight template. |
|
5 |
Convert to Accessory: Converts the currently selected hair to an accessory. |
|
6 |
Facial Hair Vertex Assignment: Re-assign the skin weight of the hair. |
|
7 |
Mesh Polygon Reduction section:
|
|
8 |
Smooth Mesh: Lets you smooth real-time smooth or subdivide the actual hair mesh |
|
9 |
Display section: Lets you show/hide, set the render states and shadow mode for the selected object. |
When a part of a character's clothes or gloves is selected, the Attribute tab
will resemble the following illustration: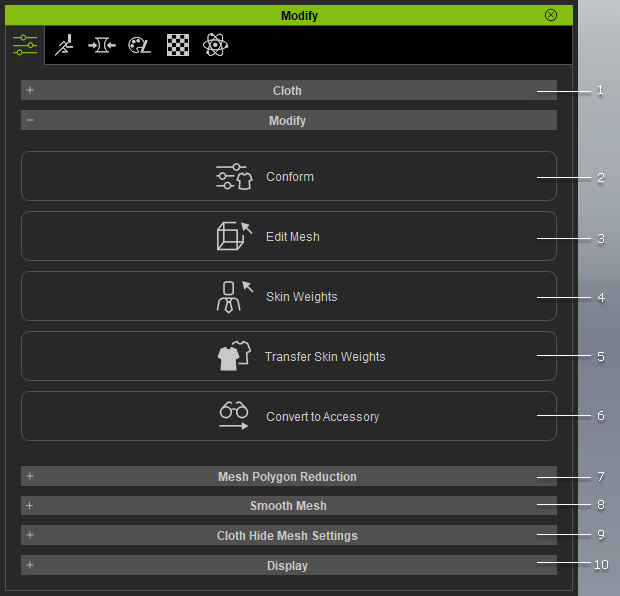
|
1 |
Cloth or Glove section: Displays the name of the cloth or gloves. |
|
2 |
Conform: Lets you conform the clothes or gloves to the character's body and hands. |
|
3 |
Edit Mesh: Provides tools for fixing mesh related imperfections. |
|
4 |
Skin Weights: Lets you modify the skin weights manually. |
|
5 |
Transfer Skin Weights: Lets you assign an automatic skin weight template. |
|
6 |
Convert to Accessory: Converts the currently selected cloth or gloves to an accessory. |
|
7 |
Mesh Polygon Reduction section: Lets you reduce the number of the polygons of the selected clothes or gloves entirely or by element.
|
|
8 |
Smooth Mesh: Lets you real-time smooth or subdivide the actual mesh |
|
9 |
Cloth Hide Mesh Settings: After clothes, shoes or gloves are created, manually hiding can not only remove mesh poke-throughs but can also decrease the size of the character for rendering or exporting. The hiding information will be stored to the clothes utilizing this feature, which ensures the body mesh hidden status when the clothes are applied. |
|
10 |
Display section: Lets you show / hide, set the render states and shadow mode for the selected object. |
When the character's shoes are selected, the sections in the Attribute
tab will resemble the following illustration: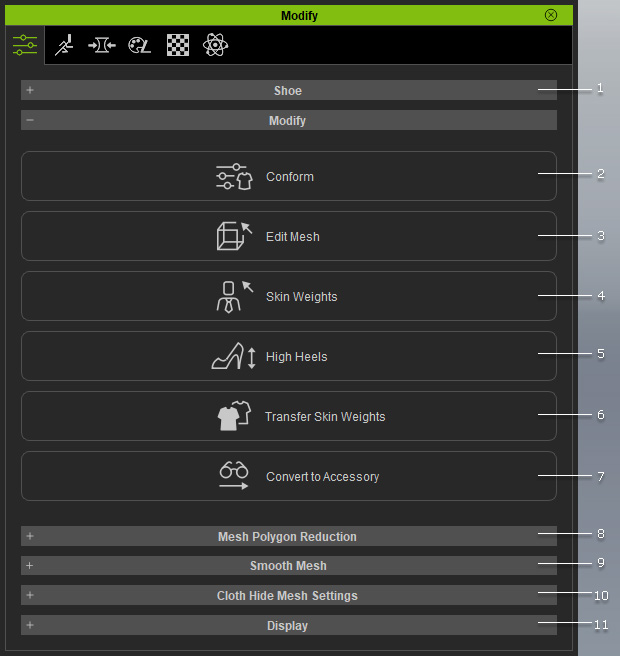
|
1 |
Shoe section: Displays the name of the shoe meshes. |
|
2 |
Conform: Lets you conform the shoes to the character's feet. The method is the same as conforming the clothes. |
|
3 |
Edit Mesh: Provides tools for fixing mesh related imperfections. |
|
4 |
Skin Weight: Lets you modify the skin weights manually. |
|
5 |
High Heels: Rotates and positions the ankles so that the soles and heels can stay flat on the ground. |
|
6 |
Transfer Skin Weights: Lets you assign an automatic skin weight template. |
|
7 |
Convert to Accessory: Converts the currently selected shoes to an accessory. |
|
8 |
Mesh Polygon Reduction section: Lets you reduce the number of the polygons of the selected clothes or gloves entirely or by element.
|
|
9 |
Smooth Mesh: Lets you smooth real-time smooth or subdivide the actual mesh |
|
10 |
Cloth Hide Mesh Settings: After clothes, shoes or gloves are created, manually hiding can not only remove mesh poke-throughs but can also decrease the size of the character for rendering or exporting. The hiding information will be stored to the clothes utilizing this feature, which ensures the body mesh hidden status when the clothes are applied. |
|
11 |
Display section: Lets you show / hide, set the render states and shadow mode for the selected object. |
When a character's accessory is selected, the sections in the Attribute tab
will resemble the following illustration: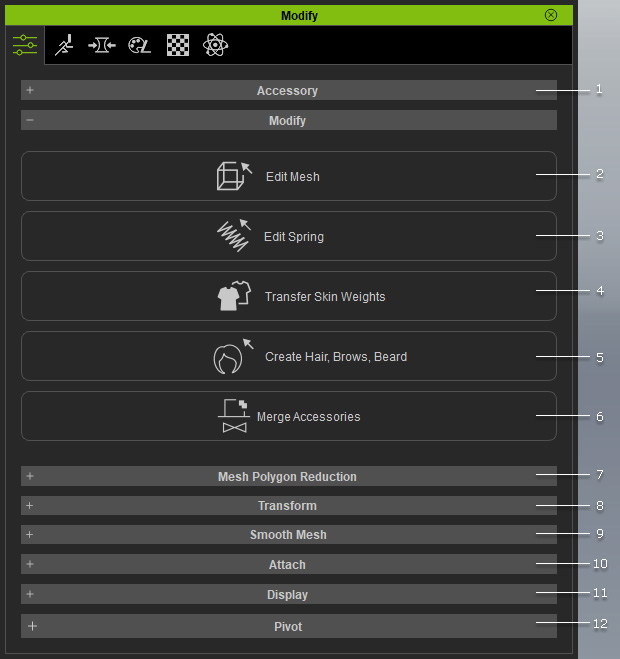
|
1 |
Shoe section: Displays the name of the accessory meshes. |
|
2 |
Edit Mesh: Provides tools for fixing mesh related imperfections. |
|
3 |
Edit Spring: This feature can be used to set spring properties to the Used Bones in the Bone List panel. |
|
4 |
Transfer Skin Weights: Lets you assign an automatic skin weight template. |
|
5 |
Create Hair, Brows, Beard: Click this button to convert the currently selected accessory to hair, brows or beard. |
|
6 |
Merge Accessories: If the picked accessory contains sub-items, click this button to merge them. However, if a sub-item is selected, then the button
will change to Remove Sub-item. |
|
7 |
Mesh Polygon Reduction section: Lets you reduce the number of the polygons of the selected accessory entirely or by element.
|
|
8 |
Transform section: Allows you to transform the RTS (Rotation, Transformation and Scale) data of the accessory. |
|
9 |
Smooth Mesh: Lets you smooth real-time smooth or subdivide the actual mesh |
|
10 |
Attach section: Allows you to change the parent node for the accessory to be attached to. |
|
11 |
Display section: Lets you to show / hide, set the render states and shadow mode for the selected accessory. |
|
12 |
Pivot section: Allows you to change the pivot of the accessory. |
When a prop is selected, the sections in the Attribute tab will
resemble the following illustration: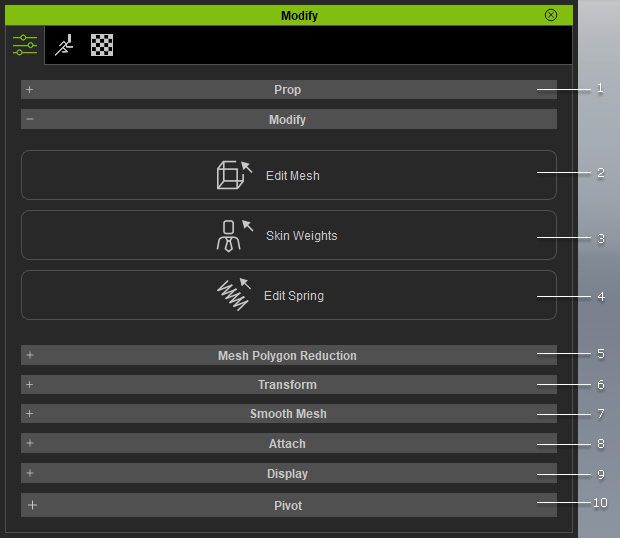
|
1 |
Prop section: Displays the name of the prop, lets you convert the prop to character, and set props as dummy. |
|
2 |
Edit Mesh: Provides tools for fixing mesh related imperfections. |
|
3 |
Skin Weight: Lets you modify the skin weights manually. This button only shows when the prop is bone-skinned. |
|
4 |
Edit Spring: Click this button to apply spring effect to specific bones. |
|
5 |
Mesh Polygon Reduction section: Lets you reduce the number of the polygons of the selected prop entirely or by element.
|
|
6 |
Transform section: Lets you transform the RTS (Rotation, Transformation and Scale) settings for a prop. |
|
7 |
Smooth Mesh: Lets you smooth real-time smooth or subdivide the actual mesh |
|
8 |
Attach section: Allows you to change the parent node for the prop to be attached to. |
|
9 |
Display section: Lets you show/hide, set the render states and shadow mode for the selected object. |
|
10 |
Pivot section: Lets you modify the pivot of the prop. |
When a light is selected, the sections in the Attribute tab are shown
in the following illustration: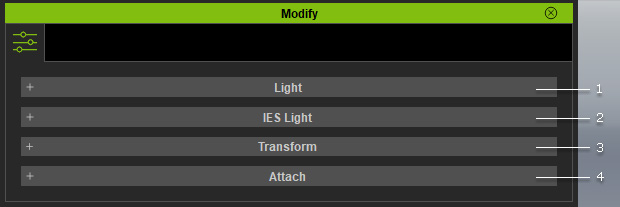
|
1 |
Light section: Lets you adjust the basic settings for the selected light, such as the strength, color or shadow darkness and so on. |
|
2 |
IES Light (for Spotlights and Point Lights only): IES stands for the Illuminating Engineering Society, which is a type of file, in *.ies format, for describing the distribution of light from a light source. |
|
3 |
Transform section: In this section, you can transform the RT (Rotation and Transformation) settings for the light. |
|
4 |
Attach section: Allows you to change the parent node for the light to be attached to. |
When a shadow caster is selected, the sections in the Attribute tab
will resemble the following illustration:
|
1 |
Shadow section: Lets you adjust the basic settings for the selected shadow caster, such as the strength, shadow intensity, shadow range, etc. |
|
2 |
Transform section: In this section, you can transform the RT (Rotation and Transformation) settings for the light. |
|
3 |
Attach section: Allows you to change the parent node for the shadow caster to be attached to. |
When the sky is selected, the sections in the Attribute tab will
resemble the following illustration: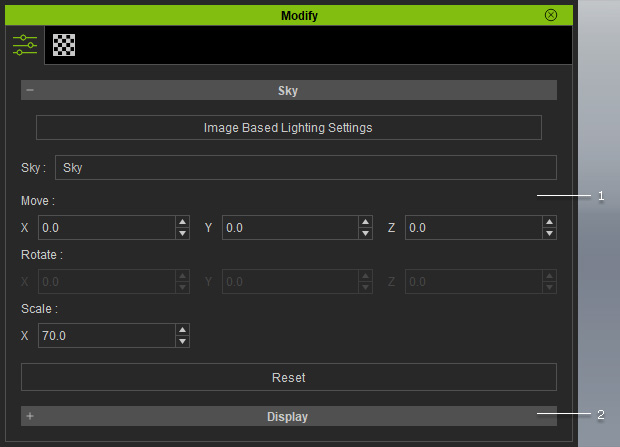
|
1 |
Sky section: Lets you transform the RTS (Rotation, Transformation and Scale) settings for the sky and switch to the IBL section in the Visual panel. |
|
2 |
Display section: Lets you show/hide, set the render states and shadow mode for the selected object. |
When a camera is selected, the sections in the Attribute tab will
resemble the illustration below: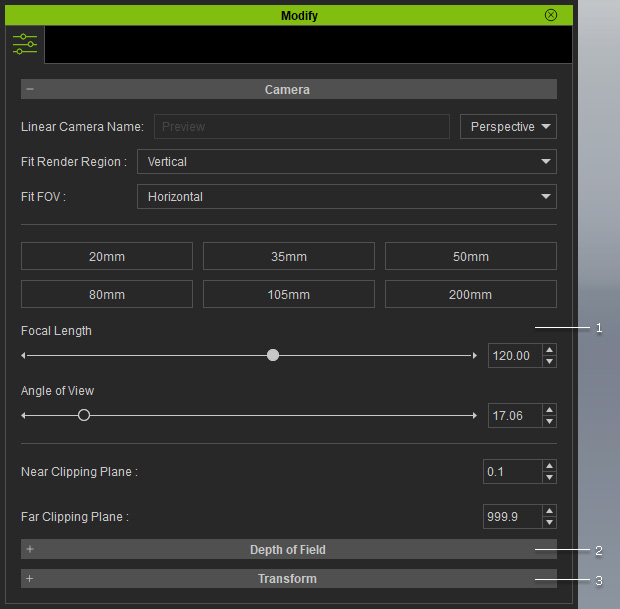
|
1 |
Camera section: Lets you edit the Lens settings for the camera. |
|
2 |
Depth of Field section: Lets you activate and change the DOF effect for the entire scene. |
|
3 |
Transform section: In this section, you can transform the RT (Rotation and Transformation) settings for the camera. |
When a light is selected, the sections in the Attribute tab will
resemble the following illustration: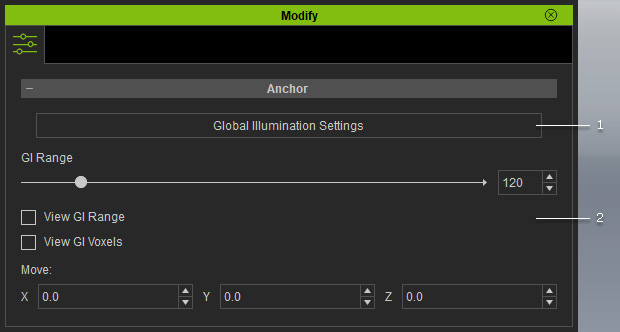
|
1 |
Global Illumination Settings: Accesses the Global Illumination tab in the Visual panel. |
|
2 |
GI Settings: You can adjust and visualize the GI range based on the GI Anchor and move the anchor with these settings. |


