


Timeline Operation - Basic
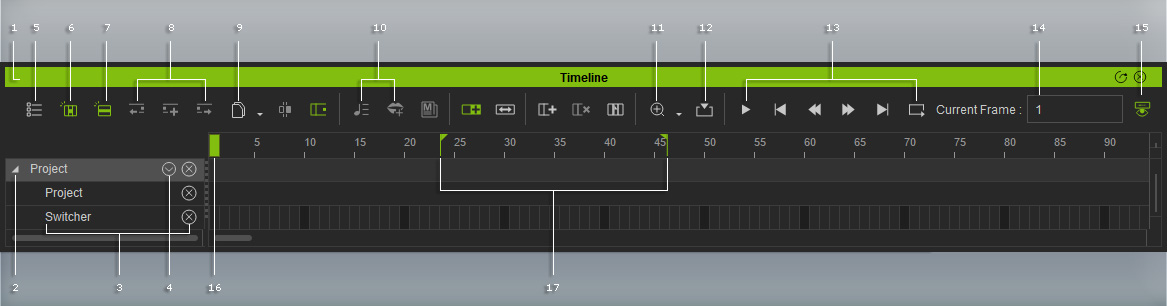
Basic Timeline Operation
|
1 |
Dock / Undock |
Double-click on the caption to dock the panel to the docking place, or undock the panel and make it float above the main program. |
|
2 |
Display Sub-Tracks |
Click this triangle button to show selected sub-tracks. |
|
3 |
Sub Track |
|
|
4 |
Main Track |
|
|
5 |
Track Menu list |
Click the drop-down list and select the items, you wish to show / hide on the Timeline. |
|
6 |
Object Related Tracks |
When you pick an object in the 3D viewer with this button activated, the Timeline will only display the tracks of the picked object. |
|
7 |
Open Same Track Types |
When you pick an object in the 3D viewer with this button activated, the Timeline will display the similar tracks that belong to other objects, which are related to the picked object. |
|
8 |
Previous and Next Key |
|
|
9 |
Clip Editing Tools |
Click this button to show the clip editing drop-down list.
|
|
10 |
Audio Editing Tools |
|
|
11 |
Zoom In / Out |
Click this button to use the tools in the drop-down list to zoom in / out the timeline.
|
|
12 |
Current Frame |
Click the Current Frame button to snap the timeline view to where the playhead is. |
|
13 |
Play Back Controls |
Refer to the Play Bar section for more information. |
|
14 |
Current Frame |
This field shows the current frame number when you click on the target frame in the timeline. You may also type in the frame number to jump to the target frame. This allows you to go to any precise target location. This is especially convenient for animation with clear timing control. |
|
15 |
Play Bar Show / Hide |
Click this button to show or hide the play bar. |
|
16 |
Play Head |
Drag to move to the desired time frame. |
|
17 |
Playback / Render Range |
Set the two flags to decide the range for playing back or rendering. |


