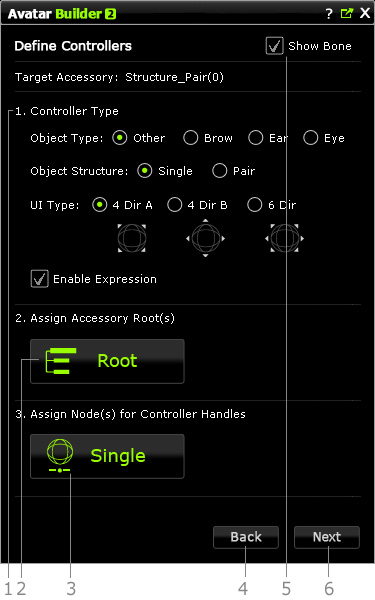
After you click the Accessories button in the
Home Panel, the Builder will switch to the Define Controllers page.
You may use this page to define the appearance of the compass for
puppeteering the accessory, the root and the nodes of the accessory that are
able to be manipulated by the Controller.

|
1. |
In this step, you are able to define the accessory's structure, the controller's look and enable the handles that can puppeteer the accessory. Object Type
Choose one of these radio buttons to define the type of the accessory and also
to enable the
associated tab in the Controller for puppeteering the accessory. Object StructureChoose one of these radio buttons to determine if the accessory is composed of single (such as tail) or binary (such as ears) components. This parameter determines if you can puppeteer the entire accessory as a group or divided it into two parts for individually puppeteering. UI TypeChoose one of these radio buttons to pick the ideal compass you intend to use for puppeteering the accessory. The picked compass will be shown in the Define Puppet Behavior Page and Controller.
Because the eye accessories is suggested to be composed of different structure,
the compass for them is fixed and a little bit different. It is
divided into three sets of handles in the compass, Eyeball,
Blink and Eyelid. Enable Expression
In addition to the type you have chose in the
Object Type, if you want the accessory to be also puppeteer-able in the
Expression tab of
the Controller, then activate this box so that the accessory can be
collaborated to animate with the expression animations. |
||||
|
2. |
Click this button to start specifying the root or roots of your accessory. Please refer to the section below for more information. |
||||
|
3. |
Click button or buttons in this step to start activating the nodes of the accessory to be puppeteered by specific handles. Please refer to the section below for more information. If you choose Pair as the Structure of the accessory, then you will see two buttons in this step. You need to separately activate the boxes of the nodes for the components in the pair.
|
||||
|
4. |
Click this button to move back to the Home Panel. |
||||
|
5. |
Activate or deactivate this box to show/hide the bone structure of the accessory. It is useful when you need to identify which bones are controlled by certain handles such as compass or slider. Please refer to the section below for more information: |
||||
|
6. |
Click this button to move to the Define Puppet Behavior Page. |