Introduction of Import 3D Motion Panel
The Import 3D Motion panel allows you to import 3D motion and convert them for use with 2D characters in Cartoon Animator.
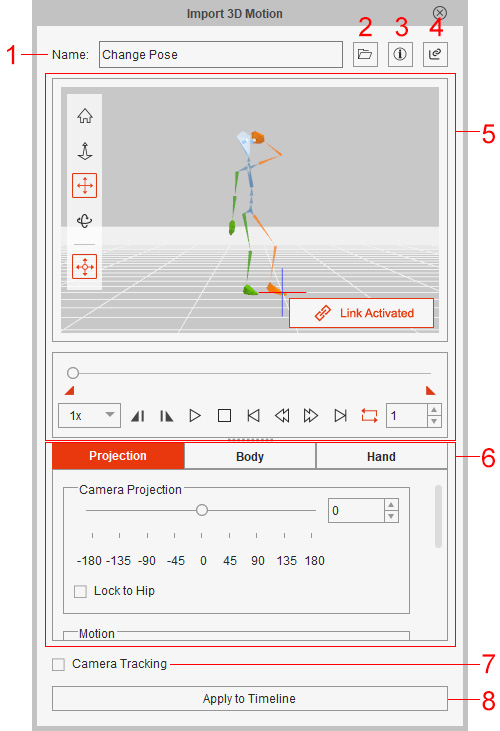
The name of the imported 3D motion.
Click this button to browse to a library folder and find the desired 3D motion you wish to import.
Click this button to open the Cartoon Animation Online Manual for more information on introducing this panel.
Click this button to get more 3D motion contents on the Reallusion Content Store.
The preview window for previewing the imported 3D motion.
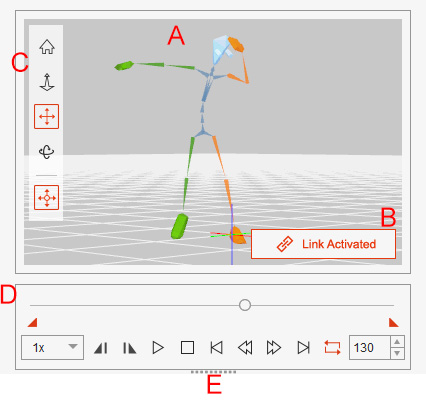
The dummy character in 3D View performs the imported 3D motion. Its right hand is displayed in Green, and its left hand is displayed in Orange. The dummy's eyes are popped out for its front view.
Click this button to link / unlink the character to the 3D View dummy.
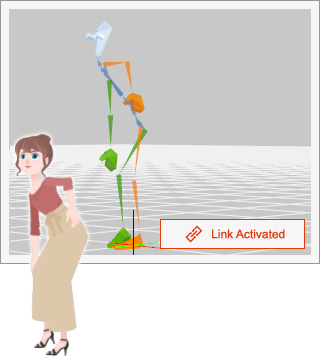 | 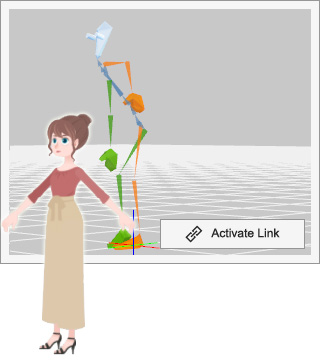 |
| The button text Link Activated, highlighted in red, indicates that the character is linked to the 3D View dummy and performs the imported 3D motion synchronously. You can click the button to deactivate the link. | The button text Activate Link indicates that the character is not linked to the 3D View dummy and performs its original default pose. You can click the button to activate the link. |
Click these buttons to control the direction of the 3D view and move or rotate the dummy.
 Home:
Reset to the initial angle of the 3D view.
 Zoom (Mouse wheel or Alt + Right + Left-mouse-buttons drag in 3D view):
Zoom in or out the 3D view.
 Pan (Alt + Drag in 3D view):
Hover the 3D view around.
 Rotate (Alt + Right-mouse-button drag in 3D view):
Rotate the 3D view around the dummy. The Camera Projection angle will be changed simultaneously.
 Camera Tracking:
Allow the camera to track the movements of the 3D View dummy so that you can keep it in the center of the screen during preview.
Use these controls to control the playbacks in 3D View.
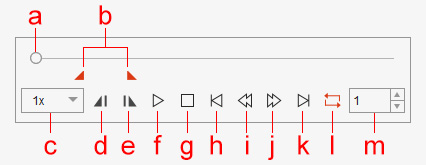
- Play Head: Show the current frame of the project. You may also quickly drag it to any desired frame.
- Mark In/Out of Playback: Drag this mark to set the mark in/out frame during playback.
- Speed: Choose a desired motion speed from the drop-down list.

- Set Start Frame (Ctrl + [ ): Drag the Play Head to a desired frame and click this button to set the cue frame of the playback.
- Set End Frame (Ctrl + ] ): Drag the Play Head to a desired frame and click this button to set the cue-out frame of the playback.
- Play/Pause (Space bar): Play back imported 3d motion.
- Stop: Stop the playback.
- Jump to Start Frame: Jump to the cue frame of the playback, or to the start frame of the imported 3D motion.
- Previous Frame: Jump one frame backwards.
- Next Frame: Jump one frame forwards.
- Jump to End Frame: Jump to the cue-out frame of the playback, or to the end frame of the imported 3D motion.
- Loop On/Off: Toggle playback loop on/off.
- Current Frame: The current frame is displayed in this field. You can type-in the frame number to jump to the target frame.
Drag the border to adjust the height of the 3D view to enlarge or reduce the viewing area.
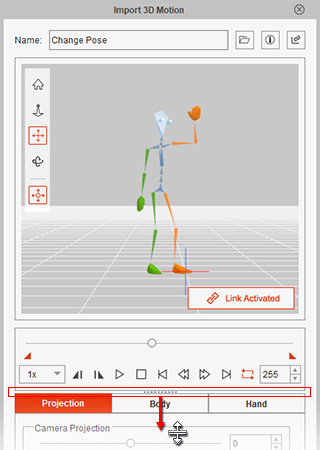 | 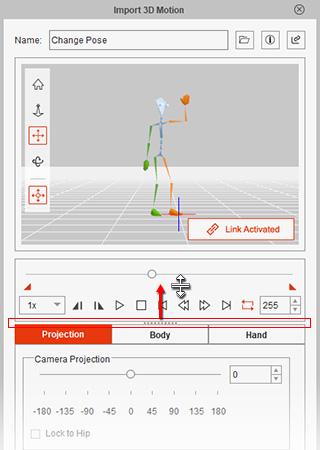 |
| Drag the border downward to enlarge the 3D view for a better and clearer view. | Drag the border upward to reduce the 3D view for adjusting the conversion settings. |
You can also drag the borders of the panel to resize it.
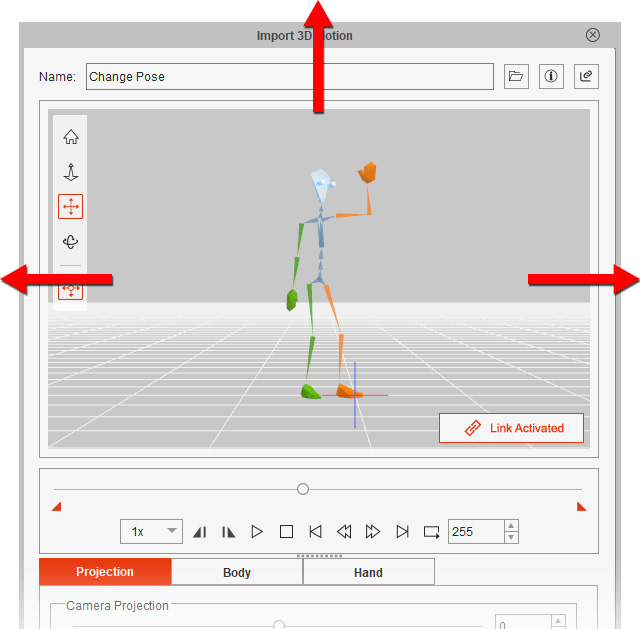
Click these three buttons to switch to different mode tabs for setting the projection angle, body movement and hand flipping.
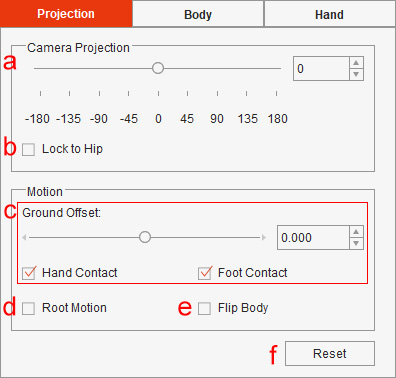
- Camera Projection: Drag the slider to rotate the camera to a desired angle suitable for your character in the 3D View and preview the character pose at this angle in real-time. You can also click on the preset buttons to quickly switch angles: 0, 45, -45, 90, -90, 135, -135, 180 and -180.
- Lock to Hip: Activate this checkbox if you wish the camera automatically rotates to the dummy's hip direction at the angle set on the Camera Projection slider in order to avoid body distortions occured in heavy turning movements or inconsistent moving directions of the upper and lower body parts.
- Ground Offset: The Hand Contact and Foot Contact checkboxes are activated by default so that you can capture 2D character's ground motions, such as sitting on the floor, kneeling, or push-ups. With these two checkboxes enabled, you can drag the Ground Offset slider to determine the character position related to the simulative floor. You can also deactivate these two checkboxes for capturing special body motions, such as space walking or swimming.
- Root Motion: Activate this checkbox if you wish to ignore the X and Z position offsets from the imported 3D motion so that a root motion can be generated for Path Animation or creating motion loops for games.
- Flip Body: Activate this checkbox if you wish the character flips automatically when performing the imported 3D motion so that the character can be animated with the opposite facing angle.
- Reset: Click this button to reset all your adjustments on this tab to default values.
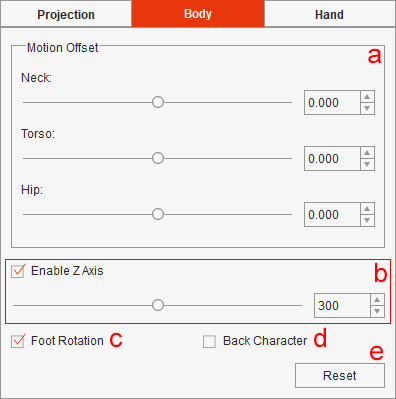
- Motion Offset: Use these sliders to rotate the neck, torso or hip of the character in order to match the personality of the character.
- Enable Z Axis: This checkbox is activated by default so that the character can be animated with Z depth. You can drag the slider to increase or decrease the moving strength of the Z axis.
- Foot Rotation: Activate or deactivate this checkbox to allow or avoid the foot rotation on ankle and toes, in order to correct foot motion in different angles of the foot sprite.
- Back Character: If you are using a character with Back or Back Side angle, activate this checkbox to swap the bone mapping of the symmetrical body parts.
- Reset: Click this button to reset all your adjustments on this tab to default values.
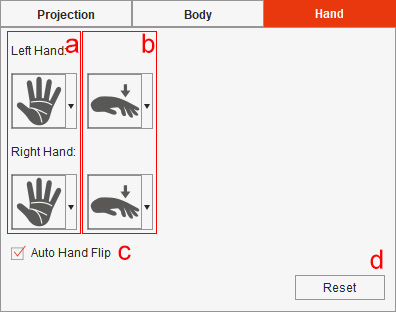
- Palm Facing: Click these two buttons to choose the palm facing for the character's left hand and right hand by cycling through the different mapping methods. Alternatively, you can select a method from the drop-down list of the button.
- Hand Flip: Click these two buttons to choose the hand flip direction for the character's left hand and right hand by cycling through the different mapping methods. Alternatively, you can select a method from the drop-down list of the button.
- Auto Hand Flip: This checkbox is activated by default so that the character will flip its hands automatically according to the imported 3D motion.
- Reset: Click this button to reset all your adjustments on this tab to default values.
Activate this checkbox to keep the animated character in view and not move offscreen during preview. Please refer to the Previewing with Camera Tracking section for more information.
Click this button to save all your adjustments on the Mode Tabs into a motion clip on the Timeline tracks.

- Facial animation will be saved on the Facial Clip track, including the head movements on the Head sub-track.
- Body animation will be saved on the Motion track.